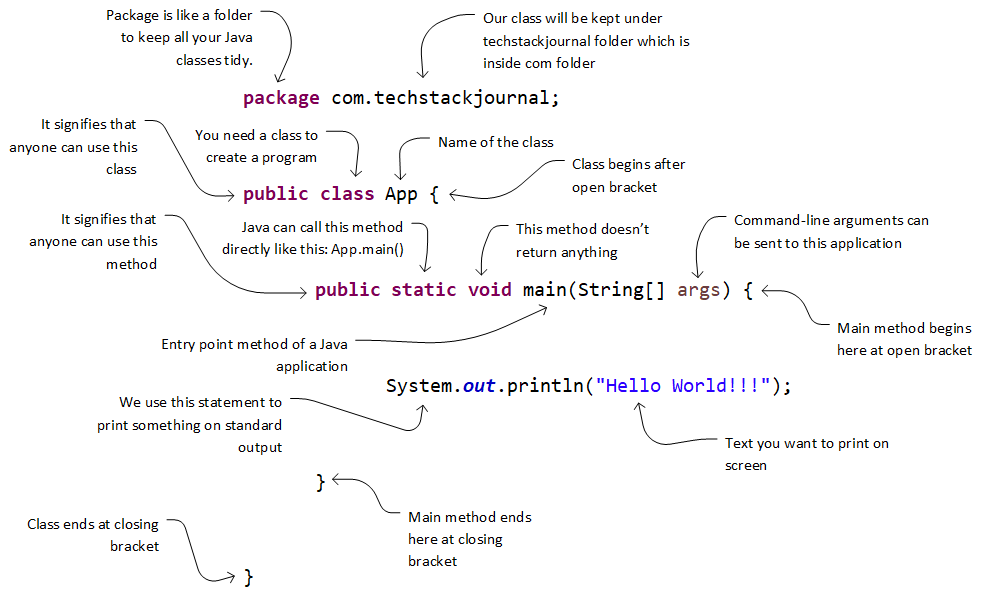
In our first Java program, we are printing a “Hello World!!!” message.
Steps to run this Java code:
Here is the code to copy:
package com.techstackjournal;

public class App {
	public static void main(String[] args) {
		System.out.println("Hello World!!!");
	}
}
Where to write this Java code?
- Text Editor
- Integrated Development Environment (IDE)
Though we can write the program in a Simple Text Editor, it is always better to use IDE, as it provides intellisense while to type code. Intellisense means, providing auto-complete options as type your program.
Writing Java Program in Text Editor
- Copy above program to a text editor
- Create a workspace folder like “D:\workspace”
- Save the file with name “App.java”
- Open Command Prompt
- Type cd d:\workspace to switch to the location of the file
- Compile your program using
javac -d App.javacommand - A class file with name App.class will be generated inside “com/techstackjournal” folders.
- To run this program type
java com.techstackjournal.App
D:\workspace>javac App.java
D:\workspace>java com.techstackjournal.App
Hello World!!!
Writing Java Program in IDE
Choosing the IDE
- There are several IDEs available in the market
- Most used IDEs are Eclipse, IntelliJ IDEA, NetBeans
- NetBeans is free and opensource IDEs
- IntelliJ IDEA comes in Community and Commercial versions
- IntelliJ IDEA Community is free but only for pure Java related programming
- IntelliJ IDEA Commercial version supports other advanced features to work on web projects
- Eclipse is free and opensource
- Eclipse also comes in various versions and for various programming languages
- Throughout this course I’ll assume that you have downloaded Eclipse IDE for Enterprise Java Developers
- Eclipse downloads can be executed directly without installation
Create your Java program in Eclipse IDE
- Extract the eclipse zip file
- Get into eclipse folder and double click eclipse.exe
- Eclipse prompts for selecting workspace, give a relevant name here like JavaPracticeWorkspace
- Select Menu, File >> New >> Project
- Select, Java >> Java Project, click Next
- Enter the project name, FirstJavaProject, click Finish
- Click on Yes, to open associated perspective, that is Java
- Expand the newly created project
- Right click on src folder and select, New >> Class
- Remove the value for Package
- Enter “App” for Name
- Select the checkbox for “public static void main(String[] args)”
- Click on Finish button, you’ll see that partial code is written for you in App.java file
- Add the print statement inside main method,
System.out.println("Hello World!!!"); - Press Ctrl+S to save the file
- Right click anywhere in the Java program and select, Run As >> Java Application
- The output will be printed in the “Console” view, just below the Java Editor
